MacroKeys – A small side keyboard

Some key strokes are hard to mind or just inconvinient. But thanks of USB capable Arduino compatible boards, you can make your very own customized little side keyboard.

Software on my Github account: https://github.com/bitlischieber/MacroKeys/

File for the case on my Thingiverse account: https://www.thingiverse.com/thing:2953199

Partlist (or, what i used):

1 x Teensy 3.1 board
1 x USB micro  cable
12 x Switches
12 x Keycaps
12 x Standard diodes (e.g. 1N4148)
Pieces of wire

Woodworm game (or the first log with USB connector)

For a birthday present every host had to paint and decorate a piece of wood. Because my artistic talents are non existing I thought “why not transfer it in to a game boy?”. So I ended up in caving out the most of the wood and stuffing in a lot of electronics. (from top to down and left to right):

  • Bi-Color (yellow/blue) OLED I2C display.
  • 3.7 V LiPo battery
  • Arduino NANO clone (ATmega328! The ATmega128 had not enough FLASH memory)
  • Booster Circuit (3.7 V to 5 V) with removed USB-A connector
  • LiPo battery charger circuit

This project presented a lot of traps and I stompled in almost everyone!

  • I milled the cutouts for the electronics staight from the top down. But the log was cut in an angle. At the edges where the corner where overhangig, the router bit was endign to cut through the crust. Furtunately I had some crust chips which I used to cover the holes :-/.
  • Routing with a bad router bit and bad equipment is more time consumig then previously estimated :-/.
  • Cheap Aliexpress Arduino NANO clone using often the ATmega128…which had not enough FLASH memory for the Adafruit graphics library :-/.
  • The booster circuit had a LiPo protection chip mounted, but the battery had also one installed. Charging was possible, but powering the circuit from the battery didn’t work. I had to bypass the protection chip using on the charger :-/.
  • The button used boucing heavily. Because I hadn’t time left for hardware debouncing I tried to debounce by software. But this ended in the choice between having a lack in control or a worm on stereoids. This issue isn’t fixed properly yet :-/.

The source code can be found on my GitHub page.

My PocketChip got sound

On little sad thing about the PocketChip is the lack of a speaker. But the guys from NextThing made it so hackable I couldn’t resist to upgrade mine. On AliExpress you find these little audio amplifier moduls for a few cents. All you need more is a speaker (or two if you like) and a few wires.

Mailbox LED light

Except from luggage trunks there are other compartments wich are quite dim: Mailboxes.

In my various electronics survival boxes I found the components to solve this issue: Battery holder, Reed Relais, an old Magnet, Boost DC/DC conveter from AliExpress (LiPo Bat. to 5V USB-A Connector) and a 12 V LED strip. The LED strip had no drivin circuit on it an the forward voltage was below 5 V. So a modification from 12 V to 5 V was by changing the current limitting resistor easy. To connect the batteries to the circuit I used the Reed Relais and the Magnet. The Magnet is attached in the mailbox inner top using adhesive. The Reed Relais ist mounted on the flap by adhesive as well. Pulling the flap upwards activates the light an let you check for post in the dark :-).

The IKEA Spotlight issue

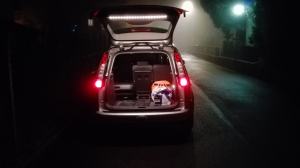
Thanks to the long-term experience in building cars, the engineers of my Ford decided to optimize the luggage boot lighting down to one, sad, tiny winy micro light bulb. For further optimisation they also decided to put it to one side of the boot, where its hidden by my stuff with guaranty.

I decided to correct this mistake of the car builders and walked in to my local IKEA Store where I could choose from a variety of different LED Lamps.
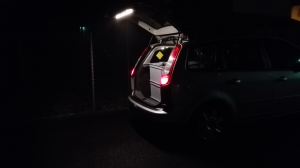
My Plan: One line of stripes on the inner side of the trunk lid to illuminate the ground if the door is opened and some spots for the ceiling.
Shortly I found a package containing 3 stripes, the 12 V power plug included, which I am not going to use anyway.
Just had a package of 4 spots in my hands, also rated for 12 V, as I saw single packages of spots for a lower price each than in the multi package. I decided 3 Spots are anyway enough and so changed to the single packages.

At home I unpacked my haul: Stripes where al-right but the spots….damn…24 V rated instead of 12 V. Of course I already tossed the packages and bill away so a return was not possible.

What does an electrical engineer in such a case: “Don’t turn it on, take it apart” as Dave Jones would say.

Inside the spot, more electronics than I expected: 2 Tranis, 3 Resistors and of course the LED.

IKEA1

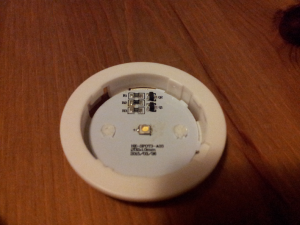
A little bit of investigations and reverse engineering reveals this constant current circuit:

IKEA2
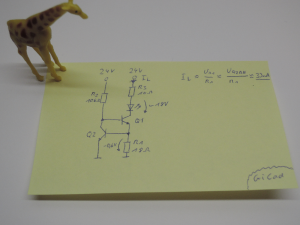
After a little bit of maths I came to the conclusion of just having to Switch R2 to 4.7 kΩ. After the mod, I applied 12 V to the Circuit and look….nothing :-/.
Time to swap to the DMM and after some measurements the cause was found: The LED seems to have a forward voltage of 18 V…damn, again.

So what’s next? Board supply is 12 V LED itself has 18 V, the simplest thing I could do was to replace the LED. For the best efficiency, a LED with a forward voltage close to 12 V would be nice. But in the Internet I just found LEDs which had either the wrong footprint or where twice the price of the whole spot including the power plug. Thankfully I found at least a few of 3 V LEDs laying around. But to make them as bright as possible, more current is needed, which also means more power drop for Q1. As a tread of brightness and power dissipation I changed R1 to a Value of 15 Ω, which means for Q1 about 320 mW where its maximum rating is 350 mW.

The installation in to the car took a couple of hours, thanks to the idiotically way how the covers and ceiling is mounted by the car builders (please go to the hell for these stupid push in clips which you never can’t get back out without damaging it or hurt yourself, please). However I am very proud of the end result and the brightness of the spots is also just right..

@Ford: That’s the way the lighting of luggage boot has to look like!

IKEA4 IKEA5